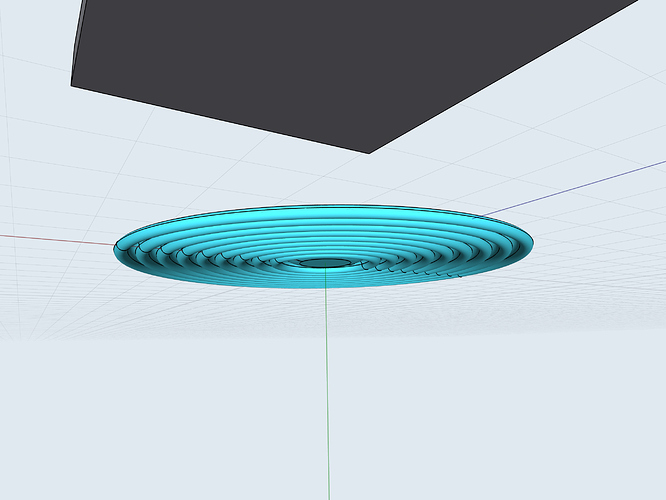
Issues building casting mold from 3D model

Hello everybody,

I’m trying to build a casting mold from a 3D model by building 2 single bodies (top+bottom mold) around my actual model. After substracting my model from the boxes I still havent found a decent way how to intersect it along each mold’s surface (not in the center, since i need to print two separate casting parts)

Does anybody have experience with it? Advice much appreciated

Carla

@Carlotto
In the attached a Cube and simple Solid Body were Created.

Casting%20Mould

Using Tools > Color > setting Opacity Slider the Cube was rendered transparent.
Use Transform > Move/Rotate/Scale to place the Mould Pattern centrally inside the Cube.
Use Tools > Subtract to remove the Solid Body from the Cube.
You can select items using the Items List if you are unable to select direct within your Design.
Sketch a new Rectangle a little larger than the Cube, with regard to the direction of intended ‘cut’.
Pull the rectangle up to create a Body.
This will likely jump up to at least 1mm, click on the Dimension displayed and type in 0.01mm.
Use Transform > Move/Rotate/Scale to place the thin ‘sheet’ intro position of the intended cut
Use Tools > Subtract to separate the cube.

I am unsure if 0.01mm will affect your Design and whether this would have to be compensated for?

Alternatively you could create two separate halves of the Cube place them tightly together and then subtract the Solid Body. Subtract from one half Cube using ‘Keep Original’ shows top left. Then repeat for second half Cube, either keeping or trashing the Solid Body as required.

It’s great to see users helping newer users, Community is everything!

Best,

Tommy

1 Like

@tommyn
Every request for assistance that appears on the Forum receives attention as part of my learning curve. Writing up a solution is also part of the journey because it helps to hammer home routines.

I absolutely agree Community is Important and needs to start by making all New Users feel welcome. It is easy to forget the first stumbling steps that most experience, just a little help can set a New User on track and rolling. Frustration to happy S3Ding in no time.
My hope is that Members reading this will be encouraged to offer assistance when possible.
The spin off will be good for all Users, we all have our own ideas and methods putting them on display has the potential to improve the knowledge of more than just the person asking for help.
It is really great to have the opportunity to offer assistance and encourage anyone needing help to reach out, there are a host of willing Members to back up the splendid S3D Team.

To go full circle feedback is most helpful, especially if something needs further explanation.
Personally I like to close anything started by me.

1 Like

THX for your explanation, think I should have attached a screenshot of my model, which is more complex than a sphere, unfortunately. Let’s call it a wavy disc

The solution you describe first would lead to an unwanted result for casting :smiley: I had tried also your second option before, but I didnt manage to select all necessary items from each surface (I imported the model from SolidWorks, 147 items, app doesn’t allow me to select from items list when I use subtract tool … any hints?!)

From my perspective it seems as if I would need to redo the model in this application to avoid mistakes when selecting parts to be subtracted –– what do you think?

@Carlotto
Sorry to hear that you have problems with an import.
Subtract only allows you to select one Item, as per my alternative above.

Not at all sure if this will work.

  1. In Items > Select all the components of WD > hit image bottom left > goto Folder. ## that you just created at top of Items List > hit image > bottom right of flyout hit image > Move Selected Here
    If this places all of the components in the new Folder test that selecting the folder by opening it afterwards.
    If that you may be good to Subtract all in one.

  2. Redrawing may be quicker than you anticipate:

Create a Closed Sketch Section of your Design > Add > Construction Axis > Tools > Revolve around the Axis. [sorry for brevity but in a rush].

This is one single Body, of course this is not accurate to your requirements but it illustrates that it may not take too long to start afresh in S3D?

I have never used SolidWorks so other than the above there are too many variables to work through a string of suggestions.

Hey Carla -

just a quick note - selection in Items doesn’t work in Tools yet unfortunately.

Thank you so much for your support :slight_smile: Ill try as you propose and let you know if it worked out. Have a good day

Maybe soon :smiley:

@DanielR
The shapr. File below file seems to prove us both ‘behind the times’?
Things do move really fast in S3D :sunglasses:

@Carlotto
With a large number of Components to be moulded it might be useful to place them in a Folder for ease of Selecting?

Casting Splitting Demo.shapr (328 KB)

For those less familiar with S3D may I suggest the following:

Open ‘Casting Splitting Demo’

Tap Items Icon

[SUGGESTION] Make multiple Selections within the Items List

Select Bodies A to G inclusive

Using the Red Arrow slide 10mm to right [placing them approximately central in the Cube]

Deselect all [IIRC this used to happen automatically?]

Tools > Subtract > Tap the Cube > Next >

Select the Bodies A to G inclusive > Done

At this point nothing should remain Selected

Select the Slicing Tool [Light Blue]

Use the Green Arrow slide 15mm to left >

Deselect Slicer Tool

Tools > Subtract >

Tap the Cube > Next > Tap the Slicing Tool > Done

At this point nothing should remain Selected

Tap Body 02 [or Double Tap the top of the Cube]

Slide the Blue Arrow 10mm upward

This has created two halves of a mould

It also proves that multiple selection now functions in Tools > Subtract

This MO is also functional if the 7 Bodies are placed in a Folder

With a large number of Components to be moulded the latter might be useful?

Just for info: It may appear to be a Sketch, but the Slicing Tool Body is 0.001mm Thick.

Meanwhile I went this way

1 Like

For my next project I will try this :smiley:

1 Like

It’s great to see real-world examples like this!

Best,

Tommy