New to 3D- making an octopus! - (a little help please)

Hi everyone, and thanks for having me here in the forum.
I make sculptures out of recycled materials and I’m trying a bit of 3D printing for my current one - a friend has given me a Creality 3D printer and I’m getting to know it.

I’m making an octopus (illuminated - so I’m using translucet PLA). For the eight tentacles, about 60-70cm in length, I want to make each one out of about four sections that taper down.

I’ve managed to make a cylinder, and turn into a tube which was good. Things went a bit pear-shaped when I tried to taper. I tried sweep, loft, and I ended up making a bit of a mess.

I want to learn how to do the shapes I need so I don’t expect anyone to do them for me. Is it ok if I post drawings of what I’m after and if you’re able, you could suggest how I might proceed?

thanks!
El pato

Post away mate, there’s always people willing to help.

2 Likes

ok! thanks Shaun; here goes!

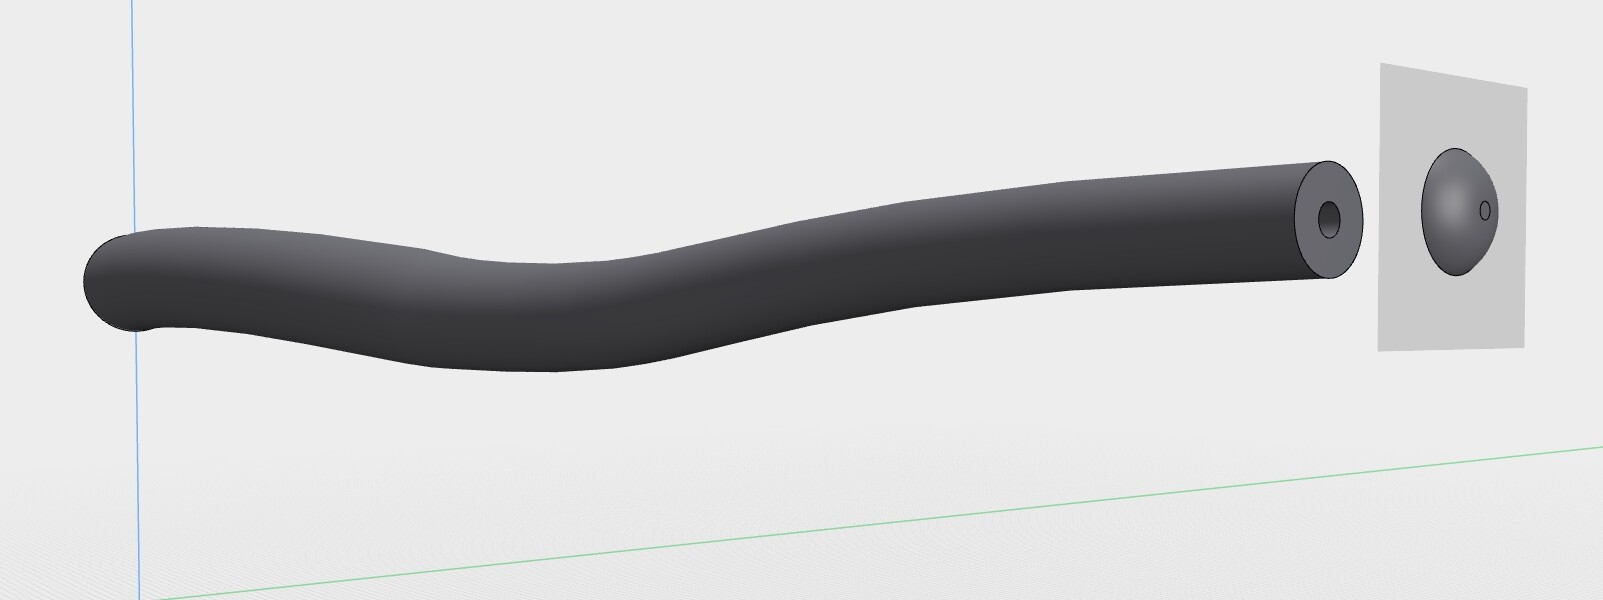
So, I’m making an octopus using a Nespresso capsule holder as a head. The octopus will have 8 tentacles starting quite thick at the head end and thin at the tips.

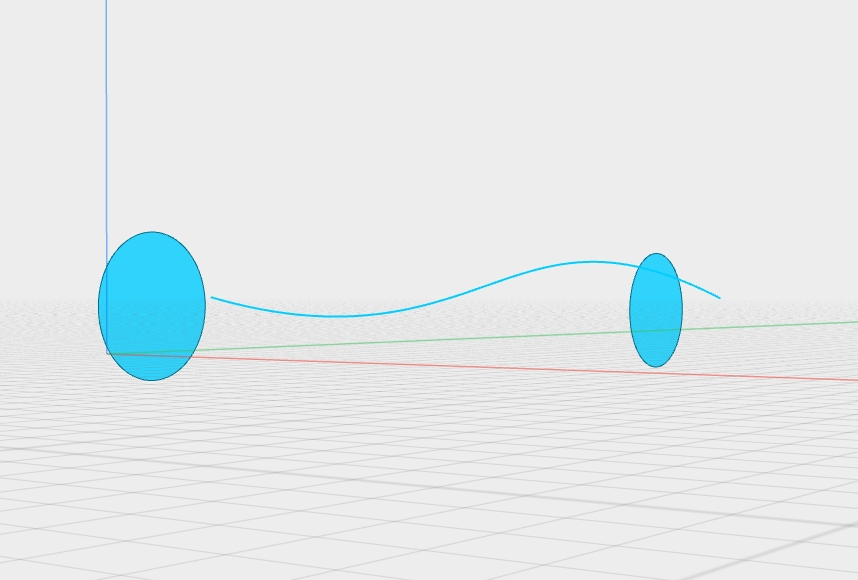
Rather than just have straight tapering tubes, each section will have a very gentle bend at the end, just a few degrees, to make it look as though the tentacle is slightly bent and moving in the water. Otherwise, just having straight tentacles would look a bit boring.

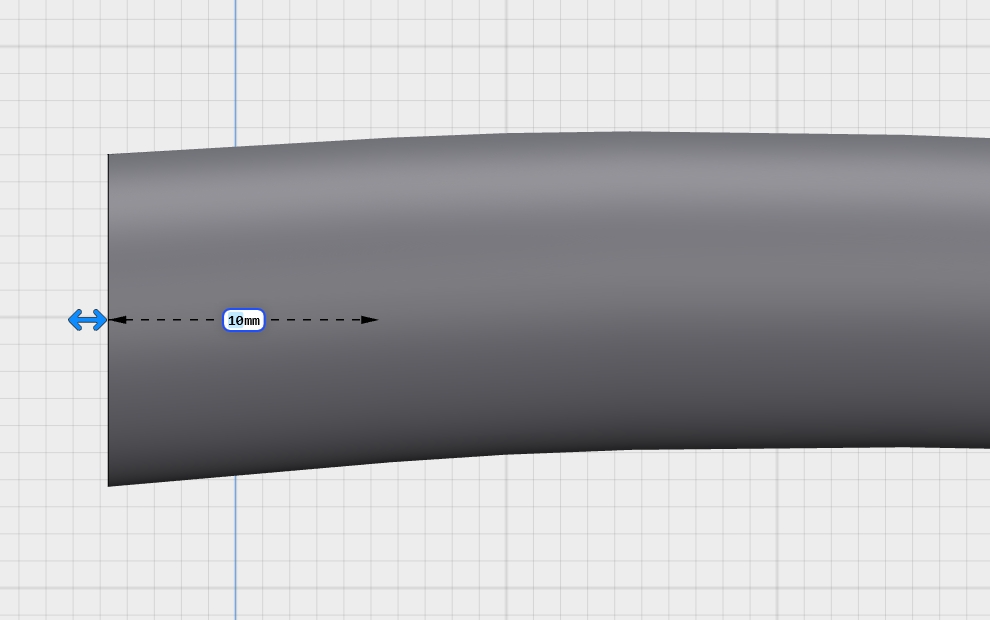
My printer can print up to 25cm I understand, so I thought might be good to make each tentacle out of four segments. The segment closest to the head would be shorter and thicker; and they reduce in diameter as you move down the tentacle. Each segment is a bit wider at the top, and reduces at the bottom. For example, each tentacle’s top segment would have an internal diameter of 22mm at the top and reduce to 18 at the bottom. The next segment starts at 17mm internal diameter, and drops to 14mm, and so on. I will fill these segments with tiny bulbs, which look great shining through the translucent PLA I’m using.

So that’s the tapering segments, with a very gentle curve at the end.

Joining the segments together - I wanted to add a flange to the top and bottom of each segment, so I can bolt them together using 2mm bolts and nuts I have. Each flange would be approx 2.5mm thick and either have 4.2mm holes to allow the bolt heads to countersink, or hexagonal holes for the nuts to nicely sit countersunk. I think you do this using a pattern, from what I’ve read.

Finally, if you looked at the top segment of the tentacle, when I printed eight of these - I’d want them slightly different lengths eg 7-9cm. That way all of the flanges won’t kind of line up, which again might look a bit odd.

I’m going to try to attach a picture which hopefully helps a little.

Step 1 I need to learn - how to make a tube that tapers from internal diameter X to internal diameter Y, with a constant wall thickness of 2mm.

Step 2 how to add a gentle bend at either or both ends of the tubes

Step 3 how to add flanges with countersinks to each end of each tube.

So if someone can help / suggest techniques or videos for Step 1 to start that would be helpful. SImilarly, if you have other suggestions such as only having 3 segments per tentacle to make it easier, or how to add things called overhangs - a friend mentioned I might need those when printing the top flanges, as they’ll need something to print on.

A long post - and if you’ve read this far - thank you!!

1 Like

And - I can do a clearer picture if needed :slight_smile:

I’m also on the free Lite version of Shapr3D (I can’t afford the paid one to be honest - I’m really grateful to even have been given the printer) - and I find when I print a tube it comes out with sort of dodecagon “sides” to it rather than being a circle, but that’s ok. I think the free version you don’t get the good resolution?

Anyway, I’ve attached a pic of my efforts haha

Here’s how I would approach this. Bear in mind that there’s always more than one way to skin a cat in modelling software.

Step 1 & 2

I created the circle with x dimension and copied it into another location for the end of the tentacle with y dimension. I used a spline to connect the two.

Following that I used Loft between the two circles and then clicked the spline to act as a guide. This can be adjusted whenever with the new parametric abilities. I finished by shelling it, be sure to click both ends when you shell.

Step 3

Go back to the end sketch and use the Offset Edge function to create another circle, then simply drag this back to create the flange and union it. You’ll notice that I had to go into history and change it to Union, for some reason clicking it wasn’t working.

Following that, simply draw a circle for a a hole and use the Pattern tool with radial selected. Drag the centre point to the centre of the pipe and drag them around the circle.

You can add a chamfer to the holes by just clicking the edges and dragging in or out (I didn’t do this in the video).

Hopefully that’ll get you started.

1 Like

Thanks Shaun! I’m going to give that a go tonight, steps 1 and 2. I’ll report back.

I was thinking over lunch about the flanges. If there’s one at each end - the one on the printer bed will print fine, but the one up in the air at the other end of the wavy tube will flop when it does the flange, as there aren’t any supports.

So I thought about 45deg supports from the tube up to support the wider flange, but that won’t work because where they are holes to bolt tubes together, the supports would get in the way.

So I’m thinking of another cunning idea of using male and female threads printed on the tubes!

But first, I’ll try your steps 1 and 2.
thanks!!

1 Like

Hi Shaun,
Your videos are pretty good!

I gave steps 1 and 2 a go and made some progress. When I created a circle it didn’t appear on the correct plane but I managed to figure out how to position it properly. Then I created a 2nd circle some distance out and changed the diameter - all good.

Then I tried to create a spline which went ok but there was no way I could see to connect the ends of the spline to the circles. It simply created a spline sitting in empty space and when I tried to Loft shapr wouldn’t allow it. It threw the error in pic005 (attached)

I’ve attached 2 pics of my circles and floating spline. I tried to zoom in on your video to see if I was missing something - I am - but I couldn’t see it.

For the 3rd picture I had a go at Loft and it did a tapered tube, because the spline wasn’t connected. Then as good practice for me


pic005
I followed your instructions to Shell and both ends and I got the tube effect which is good progress! (pic004)


Here’s another video of the first steps mate.

I use the cube to set the plane so I know everything is centered to begin with. I then copy and paste the second circle so I know it’s aligned with the first.

I use the cube again to set the grid from the front. This way I know it’s cutting through the centre of the circles.

You’ll notice that once I enter sketch mode, there’s tiny purple dots where the circles intersect with the grid. I draw my splines from and to these purples dots.

1 Like

Oh very good - I understand now. Success! I can create wavy tubes with shells (I attached pic005 with my first attempt!)

I’ll spend the next couple of days practising modifying splines, and then think about threads to go inside one end, and outside of the other. And a new, clearer diagram will help too.

Where are you based Shaun? (I’m in NZ)

I’m English but I live in Thailand mate.

Hi Shaun
Thailand, nice - not been there but a bit warmer than NZ at the moment I think.

I’ve been playing around with the wavy tubes, they’re going good now. I came up with a cunning idea I think will be easier than trying to do male and female threads to connect the tentacle segments together. All I have to do is have a lower tube with outer diameter says 14.5mm, connecting to a tube (tentacle piece) above it with an internal diameter of say 15mm for wiggle room.

That way I can dry fit the pieces, and when happy with placement put a little clear glue on the internal diameter piece and then it’s done! The top piece connecting to the octopus head I may still need a flange or similar mechanism, as I want to be able to remove the string of tiny light bulbs, if one blows.

I’ve attached a scan of a diagram I’ve drawn showing how I think the tubes could connect. The bottom bit is easy, it’s just the open tube. Do you have some suggestions I could try to create the lesser diameter “mini-tube” on the tops of the tentacle pieces?

The other bit I’ll need to learn is for the tentacle tips, to somehow close the thin end off in sort of a blunt cone about 5mm in diameter. It doesn’t need to be open of course.

Thanks for any advice or suggestions, I am definitely learning some things.
I spent last night wrestling with bed levelling my printer… that’s a crazy world haha

The tip isn’t too difficult. Just continue with the same technique but make it small on the end and and fillet it once you’ve lofted. You’ll see that I selected the first spline sketch so that I could make the two splines tangent, ensuring the faces are flat against one another.

The next part will depend on how much space you have to play with which is dependent on the curves you have before and after the parts join.

I’d start with selecting the end face, use the Offset Edge tool to create the inner part and then you’ll probably have to union on one end and maybe subtract from the other.

2 Likes

OK I’ll give that a go this weekend Shaun.

That’s a good spot - when I design the bits (ends) of the tubes that are to connect, I should make those end bits straight - so they slot into each other :+1:

thanks!

I’ve got all kinds of issues with clogged extruder, bed levelling, it’s driving me nuts. One minute the printer works, next minute nothing comes out at all!

OK, made a little progress. I figured out from your video how to do a three circle with spline hollow tube (see image010 attached).

The solid (chamfer/fillet) bit didn’t work - I suspect because I had shelled out the tube. (see pic 011). When I tried to even copy it (I thought I could make a little solid cap by copying and moving a circle out a bit, chamfering that, then gluing it on but it wasn’t having a bar of it.

Bit late here and my eyes are giving up, but tomorrow I’ll making a circle of the same diameter, extruding say 15mm, trying to chamfer and then line it up.

Thanks again for the help - I’m slow but making progress. More than I can say for levelling the 3D printer!!!


You should be able to go into the Shell history and change which faces you use for the shell, and just choose the one to have the closed end.

1 Like

I’ll try that tonight. I’ll see if I can get it "shell"ed all the way down the length of the tube except about 10-15mm at the end which can be closed off as the tentacle tip.

There will be a string of lights pretty much right down to the tip - I don’t them coming out.

Another idea - if I can’t get that to work - is to stick with the shell but form the tip so the final circle is about 3mm in diameter - so there’s no way the lights could stick that.

Like you see in an earlier note - there’s lots of ways to do things, I’m finding!

OK I had a go at filleting the end. With a shelled tube, it wouldn’t accept the fillet. I re-did the tube as solid, then fillet - I managed eventually to get the tip rounded off, but when I tried to shell it wasn’t having a bar of it (image 015).

So using my newfound tube skills I did a tapered, shelled tube which was about the right length etc(image 016, 017).

Then I managed to add another plane, a circle to that plane, extruded it a few mm, filleted that. (I was quite proud of that haha). I can’t quite figure out how to “glue” that extra piece on (image 018).

I’ll give the Offset Edge bit a go. I don’t think I need much reduced inner tube that goes into the bit above - 10mm should be ok.

thanks


Try and use the align tool on that rounded end section, then click on the flat face and click on the end face that you want to glue it to.

After that, use the union tool to glue them together.

Success! See 019 attached. Awesome :slight_smile:
I’m going to carefully sketch out the joining tube-to-tube bits, and note the measurements of the inner tubes etc - a bit of planning is probably a good idea here!

I’ll get busy drawing.

2 Likes

Hi Shaun,
I got one end of the tube and Offset the edge - it seemed to stretch it out which was fine. I extended it 10mm. Then I got completely lost and couldn’t work out to do the inner tube within the exterior walls of the tube.
I couldn’t get Subtract to work, but I wonder if it’s worth designing the whole 3-part tentacle, making sure there’s at least 25mm of straight section in the parts where the tentacles will be joining, and have those inner tube bits we’re working on.

I’d still have to figure out how to split the tentacle into three and do the inner tube bit though.

I’ve attached a sketch confirming how I would like the inner tube to work. It only has to be 10mm high to slot into the tube above it. And, I’m allowing the exterior diameter of the inner tube to be 0.5mm less than the inner diameter of the tube above it to be sure it’ll fit. Once it’s in and looking good, I’ll separate and then add a tiny bit of clear glue and then re-join.

I added a picture of the tube too, showing the 10mm offset I did (but not much success apart from that). I’ll keep playing around though.